
We began by tearing out two non-load-bearing walls, some old plumbing, and trashing a great deal of debris that had been left behind, as previous years the space had been rented to Halloween stores, and they had left massive amounts of crap. Once we had all of that out, and our dumpster hauled away, we brought in our electricians and plumbers to inspect our situation and make bids.
Our electricians were blown away by the out-of-code work that had been done on this site- we were aware that there were problems, but the scope of the work was a lot more than expected. We asked our landlord to cover all costs associated with bringing the electricity up to code. Any changes to the electric system that were our own changes- the installation of new wall switches, new outlets, and electric bathroom fixtures (lights, tankless water heaters, hand dryers) would be changes we would pay for. This request was refused at first, then the landlord offered to pay for half of what we were asking for.
Then the plumbing- our plumbing contractor had us examine the current plumbing system with a scope- and the results were again worse than we expected. The only two existing working toilets were attached to the old sewer line in only the most minimal way possible- not up to code, and not in a way that safely allowed for proper disposal of waste. The cost to repair this so that the existing toilets would work properly- not the new ones we'd be installing later, was significant. And we asked the landlord to be reimbursed for that. We were refused this outright.
Then the rear left wall- In some year past, our neighbor on the south by our rear exit decided to add two feet of depth to the parking lot without getting a permit, and in doing so decided to use the wall of our building to hold everything up. They put in no drainage or waterproofing on our wall, and in subsequent years the wall has started to buckle and leak. This was all done before the current owner of the lot purchased it, who was unaware of the problem when it was bought. Thankfully, after discussing the situation with the lot owner, they have agreed to right the problem without any fighting or disagreement. Dealing with them so far has been easy and excellent.
Then the floor- After the Halloween store moved in, and back out again, we began work. We had no building permit yet, so we were limited to wall and floor covering work at the time. All the while we are negotiating and expecting the landlord to agree to our costs, making offers closer to midway between where we and our landlord saw the costs being split. And we kept getting turned down. Then after ripping up the carpet we inspected the floors. And the back 25% of the floors were thrown in over pits with no infill or reinforcement, and the slab was installed in some places at less than an inch thick- when concrete slab is supposed to be at least four inches thick.
These new costs coupled with our costs of making the building ADA compatible were skyrocketing. I can't use any specific numbers here, but suffice it to say costs associated with just making the building acceptable for our use had long since passed half our total project costs, and our landlord has been fighting us on every penny. Meanwhile, Jake and Martin had been getting paid for their work, and money had been spent on the improvements and supplies for the further work expected. All this before we had done any building of a golf course at all. Then...
Monday, November 28, 2011

Subpar Miniature Golf- What we learned
So with a space and existing as a legal entity, we began the research. I began to catalog all the costs I expected to have with the project, find suppliers, line up contractors, and see if the project was feasible. And the more we dug into the project the more costs and problems we found.
First there was the rear emergency door, which was not installed to ADA spec, and an entire front window assembly that was going to have to be replaced. Then there was the security deposit- a whopping $25,000, which, at the time was about half of our projected budget for the entire affair. We also put together income projections and things looked gloomy- even optimistic projections put us short every month. All told, everything began to look like the project was dead in the water- which was OK, my expenses in the project were minimal, and we hadn't signed a lease yet. But my dream of opening a miniature golf course was over.
But then I was contacted by my friend Bobby, who I hadn't talked to in a while, but is something of a business guru himself. He urged me to do some research that would give him the info he needed to see if this project was, in fact profitable. David and I researched customer numbers at similar establishments, competitor's pricing and services, and we sent our findings on to Bobby, along with our expected costs and income sheets from before. He sent us back some numbers that looked substantially more promising- we weren't going to be wealthy by any stretch of the imagination, but I might make enough money to support myself.
So with things looking positive, we signed a lease (after a whole long to-do regarding the Halloween store, which I'll recount at another time.) We had noticed some issues with the electrical system, but these were issues that the landlord would cover, or so we thought. We began work on the project in mid-august, with some light demolition work. Continued in part 3.
First there was the rear emergency door, which was not installed to ADA spec, and an entire front window assembly that was going to have to be replaced. Then there was the security deposit- a whopping $25,000, which, at the time was about half of our projected budget for the entire affair. We also put together income projections and things looked gloomy- even optimistic projections put us short every month. All told, everything began to look like the project was dead in the water- which was OK, my expenses in the project were minimal, and we hadn't signed a lease yet. But my dream of opening a miniature golf course was over.
But then I was contacted by my friend Bobby, who I hadn't talked to in a while, but is something of a business guru himself. He urged me to do some research that would give him the info he needed to see if this project was, in fact profitable. David and I researched customer numbers at similar establishments, competitor's pricing and services, and we sent our findings on to Bobby, along with our expected costs and income sheets from before. He sent us back some numbers that looked substantially more promising- we weren't going to be wealthy by any stretch of the imagination, but I might make enough money to support myself.
So with things looking positive, we signed a lease (after a whole long to-do regarding the Halloween store, which I'll recount at another time.) We had noticed some issues with the electrical system, but these were issues that the landlord would cover, or so we thought. We began work on the project in mid-august, with some light demolition work. Continued in part 3.
Subpar Miniature Golf- Where we started.
I feel like I'm walking into a dusty old abandoned house.
Hello? Anybody here?
Anyone been on this blog in this calendar year?
Well, this is really the only place to post this sort of rant, so let's try to get this out in a few short hours and see if we can't get you all up to speed.
As you, a Facebook friend, are most likely aware, I am attempting to open a miniature golf course, here in the Bay Area of California. More specifically, Alameda, a city, island, municipality all of its own, just south of Oakland, and about five minutes from my apartment. Right now, we are on the precipice of the end, teetering, as my architect so plainly put it, between destruction and chaos, hoping, really to not tip either way, but the outlook is not great.
I'd like to commit to digital paper the whole story, so if you would rather not start from the VERY beginning, wait until my last post of the day, where I'll spell out the current situation in detail.
It all started with Jake, Martin, Paul and Chris, all neighbors of mine, discussing a way to get guests of our upcoming F3 event to make sure they visited all of the open studios in the building- what if there were a miniature golf hole in each place, and guests were encouraged to play a full round? An ambitious project to be sure, but definitely clever. We thought about the logistics of it, if it should be outside, whatever, and I began thinking about what we could do with all the holes at the end. There was certainly no room for them to stay in anyone's unit, storing them would be expensive, and destroying them would be wasteful. What about turning it into an actual course? Are there any miniature golf courses anywhere near here?
As it turns out, no. There isn't a single miniature golf course in Oakland, Berkeley, San Francisco, Alameda or anywhere in the western part of the bay, save for one in Marin County. The closest one to us was in Castro Valley, and that is about a 20 minute drive.
So I discussed my enthusiasm about this project and the potential market, with David, my neighbor and business start-up expert. He shared similar enthusiasm for the idea, and we started doing the research on business starting procedures. We filed as an LLC in the name of Subpar Entertainment LLC with the state of California, and started scouting properties.
There were many lots in Oakland that looked interesting, but an outdoor facility in Oakland would be prone to vandalism, and would require building a large and expensive fence and 24-hour security. We searched for indoor spaces large enough- warehouses, closed clubs, when I came upon a Craigslist listing for a space on Park Street in Alameda.
Alameda is a family-oriented city, not dense in the traditional city sense, but a nice place where there are a lot of kids, and a good police officer to citizen ratio. In other words, it is a bit of a safe haven from the cities that surround it on all sides. The good news for us is that we kept hearing was that while there were many families and young people in the area, there were few entertainment establishments, and a sore need for more.
We contacted the property manager of the space, arranged a visit of the space, and started negotiating rates. I'll admit I fell in love with it too quickly. I saw the potential in it, put not the pitfalls. I didn't have a structural engineer look at it, I didn't have a plumber or electrician inspect it, and I didn't check previous location work history. All sizable mistakes, in my own right.
But we knew, or thought we knew at the time, that this was the perfect location. When our other possible location said no, we focused our attention on 1511 Park Street, and figuring out the logistics of opening the business in that spot.
Hello? Anybody here?
Anyone been on this blog in this calendar year?
Well, this is really the only place to post this sort of rant, so let's try to get this out in a few short hours and see if we can't get you all up to speed.
As you, a Facebook friend, are most likely aware, I am attempting to open a miniature golf course, here in the Bay Area of California. More specifically, Alameda, a city, island, municipality all of its own, just south of Oakland, and about five minutes from my apartment. Right now, we are on the precipice of the end, teetering, as my architect so plainly put it, between destruction and chaos, hoping, really to not tip either way, but the outlook is not great.
I'd like to commit to digital paper the whole story, so if you would rather not start from the VERY beginning, wait until my last post of the day, where I'll spell out the current situation in detail.
It all started with Jake, Martin, Paul and Chris, all neighbors of mine, discussing a way to get guests of our upcoming F3 event to make sure they visited all of the open studios in the building- what if there were a miniature golf hole in each place, and guests were encouraged to play a full round? An ambitious project to be sure, but definitely clever. We thought about the logistics of it, if it should be outside, whatever, and I began thinking about what we could do with all the holes at the end. There was certainly no room for them to stay in anyone's unit, storing them would be expensive, and destroying them would be wasteful. What about turning it into an actual course? Are there any miniature golf courses anywhere near here?
As it turns out, no. There isn't a single miniature golf course in Oakland, Berkeley, San Francisco, Alameda or anywhere in the western part of the bay, save for one in Marin County. The closest one to us was in Castro Valley, and that is about a 20 minute drive.
So I discussed my enthusiasm about this project and the potential market, with David, my neighbor and business start-up expert. He shared similar enthusiasm for the idea, and we started doing the research on business starting procedures. We filed as an LLC in the name of Subpar Entertainment LLC with the state of California, and started scouting properties.
There were many lots in Oakland that looked interesting, but an outdoor facility in Oakland would be prone to vandalism, and would require building a large and expensive fence and 24-hour security. We searched for indoor spaces large enough- warehouses, closed clubs, when I came upon a Craigslist listing for a space on Park Street in Alameda.
Alameda is a family-oriented city, not dense in the traditional city sense, but a nice place where there are a lot of kids, and a good police officer to citizen ratio. In other words, it is a bit of a safe haven from the cities that surround it on all sides. The good news for us is that we kept hearing was that while there were many families and young people in the area, there were few entertainment establishments, and a sore need for more.
We contacted the property manager of the space, arranged a visit of the space, and started negotiating rates. I'll admit I fell in love with it too quickly. I saw the potential in it, put not the pitfalls. I didn't have a structural engineer look at it, I didn't have a plumber or electrician inspect it, and I didn't check previous location work history. All sizable mistakes, in my own right.
But we knew, or thought we knew at the time, that this was the perfect location. When our other possible location said no, we focused our attention on 1511 Park Street, and figuring out the logistics of opening the business in that spot.
Sunday, September 5, 2010
Bed Complete
Dear Internet,
You're welcome. I spared you once again the boredom of staining and lacquering a huge chuck of wood. Instead, I waited until the boring part was done to show the headboard with the upholstered panels finally in place.

Tonight I will sleep on a completed bed, though I might take some time to read leaning against the headboard, which is what it was designed for.

The bed needs a pull-out nightstand, but after two months work, I'm ready to call this one just about done.

It became too dark before I was able to get any high quality pictures of the bed all together, the shot above was the best I could do. So look for some glamor shots tomorrow.
In the meantime, I have begun work on a couple of other projects. The first, and largest, is a greatly expanding dining table- with the ability to be suited to seating 2 to 12 diners through a complex folding scheme. Should be very exciting. Here is a render of the table in CAD, folded to full size. The idea is still in its forming stages, so don't yet judge it- I know it looks a bit unstable.

The second is sincerely a vanity project. I came upon an amazing pool cue handle at an antique store in Alameda when browsing with Zac and Jessica- this in no way counts as "antiquing." Anyway, this handle had the intricate carving of a Japanese dragon on it, and I thought it would make an excellent pipe. TOBACCO pipe. I've wanted to try some wood carving- and what wood semester would be complete without it, so I've decided to make my own version of it in pipe form.
Martin gave me a hunk of ironwood- a VERY heavy and dense wood often used for knife handles, and we cut it into a chunk about the right size. Ironwood, incidentally smells of feces when cut. Not just a general bad smell, it just sincerely smells of poo.
Anyway, this is the pipe head i whipped together in modeling clay.

Eventually to this I'll add a stem about a foot long in walnut for a very cool looking, if impractical pipe. Tobacco pipe. Only tobacco.
You're welcome. I spared you once again the boredom of staining and lacquering a huge chuck of wood. Instead, I waited until the boring part was done to show the headboard with the upholstered panels finally in place.

Tonight I will sleep on a completed bed, though I might take some time to read leaning against the headboard, which is what it was designed for.

The bed needs a pull-out nightstand, but after two months work, I'm ready to call this one just about done.

It became too dark before I was able to get any high quality pictures of the bed all together, the shot above was the best I could do. So look for some glamor shots tomorrow.
In the meantime, I have begun work on a couple of other projects. The first, and largest, is a greatly expanding dining table- with the ability to be suited to seating 2 to 12 diners through a complex folding scheme. Should be very exciting. Here is a render of the table in CAD, folded to full size. The idea is still in its forming stages, so don't yet judge it- I know it looks a bit unstable.

The second is sincerely a vanity project. I came upon an amazing pool cue handle at an antique store in Alameda when browsing with Zac and Jessica- this in no way counts as "antiquing." Anyway, this handle had the intricate carving of a Japanese dragon on it, and I thought it would make an excellent pipe. TOBACCO pipe. I've wanted to try some wood carving- and what wood semester would be complete without it, so I've decided to make my own version of it in pipe form.
Martin gave me a hunk of ironwood- a VERY heavy and dense wood often used for knife handles, and we cut it into a chunk about the right size. Ironwood, incidentally smells of feces when cut. Not just a general bad smell, it just sincerely smells of poo.
Anyway, this is the pipe head i whipped together in modeling clay.

Eventually to this I'll add a stem about a foot long in walnut for a very cool looking, if impractical pipe. Tobacco pipe. Only tobacco.
Sunday, August 29, 2010
Finishing School
Bed built, there is only one thing left to do- about 100 things. I wanted to take this project one step further than the futon and actually finish it. Staining and lacquering is not the most glamorous and fun part of building, but it is necessary for appearance and durability. Last week I sanded, stained, and applied three coats of lacquer to the bed frame.
Last night, I finally brought the frame inside after it had outgassed (read: stopped smelling like lighter fluid) and put it together. Nice.

Then, it was just the matter of putting the slats back into the frame. Amos helped.


I really like the look of the light wood slats on the dark wood of the frame.

This morning Jake helped me drag it upstairs, and tonight, I will sleep like an adult again.

Last night, I finally brought the frame inside after it had outgassed (read: stopped smelling like lighter fluid) and put it together. Nice.

Then, it was just the matter of putting the slats back into the frame. Amos helped.


I really like the look of the light wood slats on the dark wood of the frame.

This morning Jake helped me drag it upstairs, and tonight, I will sleep like an adult again.

Friday, August 20, 2010
Upholster Child
Every day I get closer and closer to finishing this bed, and every day I get closer to sleeping above the floor. Yesterday I bought twenty one-by-twos to finish the frame of the bed, and stopped into an upholstery shop to get some materials.
I asked about materials, and woman in the shop ended up walking me through the entire project, start to finish. She was great, and I really wanted to buy something from her, but all her fabric was of the older furniture sort. I found a yard and a half of what I now know is green velvet in the discount bin for $10.
At home I just had to cut all the one-by twos and hammer them in place to finish the last structural work on the bed before retiring for a late afternoon of kayaking. Here is Jake testing the bed's strength.

That evening after returning I couldn't wait to get to upholstery, so I tried to see what I could do with some plywood scrap, some Super 77, and some upholstery foam I inherited from the same shop where I bought the planer, bandsaw, and the table saw. Apparently the stuff sticks damn good.

In the morning it was all about upholstery. Mike's Off-the-Cuff Dictionary defines Upholstery as turning hard furniture soft in a way that uses every staple in the shop. First, I needed to cut my foam blocks down to size. The blocks I had were four inches thick, and my headboard needed only two inches, so I needed to cut the blocks in half. I tried a whole slew (sloo? slough?) well, a lot of cutting devices; razor blades, joinery saws, hack saws, but you know what worked best? A Farberware bread knife from the kitchen. It took a bit of sawing, but it worked well.

Click here to download the cut foam desktop wallpaper!
Then the pieces were cut to size, glued together, and glued to the plywood backings. The seams were clean, and the edges were square. So far, upholstery was easy-peasy (peezy? pesey?) anyway, no real difficulty.

The next step called for wrapping the cushions in a layer of batting- I didn't know what that was either- followed by the upholstery fabric, both being stapled on all sides on the back, pulling it tight in a way to try to keep the edges straight.
The piece of fabric I had was a bit too small for me to cut two large pieces out of, so Monika helped me by cutting and sewing a couple smaller bits together.

A lot of stretching and about 200 staples later, I had both layers stretched over the cushion- no easy task since I had barely enough of each fabric. The main lesson I learned here- have extra fabric. If I had cut my pieces bigger I bet I could have made very straight edged cushions, but I'm still pretty happy with how they came out.

All-in-all I'd say getting started with some basic upholstery is easy- of course, these are just simple rectangles. I'm certain it gets more frustrating as you go up from there. The last bits left are finishing work- sealants, stains, and sanding. All to be done early next week.
I asked about materials, and woman in the shop ended up walking me through the entire project, start to finish. She was great, and I really wanted to buy something from her, but all her fabric was of the older furniture sort. I found a yard and a half of what I now know is green velvet in the discount bin for $10.
At home I just had to cut all the one-by twos and hammer them in place to finish the last structural work on the bed before retiring for a late afternoon of kayaking. Here is Jake testing the bed's strength.

That evening after returning I couldn't wait to get to upholstery, so I tried to see what I could do with some plywood scrap, some Super 77, and some upholstery foam I inherited from the same shop where I bought the planer, bandsaw, and the table saw. Apparently the stuff sticks damn good.

In the morning it was all about upholstery. Mike's Off-the-Cuff Dictionary defines Upholstery as turning hard furniture soft in a way that uses every staple in the shop. First, I needed to cut my foam blocks down to size. The blocks I had were four inches thick, and my headboard needed only two inches, so I needed to cut the blocks in half. I tried a whole slew (sloo? slough?) well, a lot of cutting devices; razor blades, joinery saws, hack saws, but you know what worked best? A Farberware bread knife from the kitchen. It took a bit of sawing, but it worked well.

Click here to download the cut foam desktop wallpaper!
Then the pieces were cut to size, glued together, and glued to the plywood backings. The seams were clean, and the edges were square. So far, upholstery was easy-peasy (peezy? pesey?) anyway, no real difficulty.

The next step called for wrapping the cushions in a layer of batting- I didn't know what that was either- followed by the upholstery fabric, both being stapled on all sides on the back, pulling it tight in a way to try to keep the edges straight.
The piece of fabric I had was a bit too small for me to cut two large pieces out of, so Monika helped me by cutting and sewing a couple smaller bits together.

A lot of stretching and about 200 staples later, I had both layers stretched over the cushion- no easy task since I had barely enough of each fabric. The main lesson I learned here- have extra fabric. If I had cut my pieces bigger I bet I could have made very straight edged cushions, but I'm still pretty happy with how they came out.

All-in-all I'd say getting started with some basic upholstery is easy- of course, these are just simple rectangles. I'm certain it gets more frustrating as you go up from there. The last bits left are finishing work- sealants, stains, and sanding. All to be done early next week.
Wednesday, August 18, 2010
Mortising Overdrive
This time I have a good reason for not posting- I've been busy working. The last four days, I spent at least 7 hours working on this bed. Of course, I'm still not done. On Sunday, I re-built the bottom of the headboard with a design that would be a bit sturdier, and installed all the structural panels.
On Monday, I assembled all the parts and glued it together. Afterward, the piece felt sturdy, like a full piece of furniture for the first time!


Yesterday, I went and got some Douglas Fir 3x3s from Martin, as the one I had left from the futon was full of sap. A sappy piece of wood usually needs 6 months to a year to dry out and be usable. Unfortunately I only figured this out after I got sap all stuck in my tape measure.
This piece allowed me to finish up the framing yesterday afternoon and early this morning. Mortises drilled and glue drying, I needed to figure a way to hold up the mattress.

After perusing a few ideas, I settled on a simple one. Twenty-five one-by-twos spanning the two side rails. And to attach them, I could drill a series of mortises along the rails! Noticing a pattern?

I enjoy the mortising machine. I admit it. And I'm looking for more ways to use it. So today, I drilled 50 mortises, one after the other. I'm not ashamed. Ok, I may have a problem.

Then it was just a matter of hammering the one-by-twos into the mortises. And if I hadn't run out of them I'd be sleeping on it tonight!
Tomorrow I'll be getting the rest of them, and buying the stuff I will need for upholstering which should be an adventure in itself. I will let you all know how that goes.
On Monday, I assembled all the parts and glued it together. Afterward, the piece felt sturdy, like a full piece of furniture for the first time!


Yesterday, I went and got some Douglas Fir 3x3s from Martin, as the one I had left from the futon was full of sap. A sappy piece of wood usually needs 6 months to a year to dry out and be usable. Unfortunately I only figured this out after I got sap all stuck in my tape measure.
This piece allowed me to finish up the framing yesterday afternoon and early this morning. Mortises drilled and glue drying, I needed to figure a way to hold up the mattress.

After perusing a few ideas, I settled on a simple one. Twenty-five one-by-twos spanning the two side rails. And to attach them, I could drill a series of mortises along the rails! Noticing a pattern?

I enjoy the mortising machine. I admit it. And I'm looking for more ways to use it. So today, I drilled 50 mortises, one after the other. I'm not ashamed. Ok, I may have a problem.

Then it was just a matter of hammering the one-by-twos into the mortises. And if I hadn't run out of them I'd be sleeping on it tonight!
Tomorrow I'll be getting the rest of them, and buying the stuff I will need for upholstering which should be an adventure in itself. I will let you all know how that goes.
Thursday, August 12, 2010
Round Pegs, Square Holes, and Something that Looks Like a Bed
Over the past week, in addition to some repairs to the chair, my efforts were focused on the bed, and making it a bit more, well, bed-like.
Martin and Jake brought over the Mortising machine on Monday, and on Wednesday morning I was ready to give it a try. The first times through there was jagged edges and a bit of smoke, but it worked. Square holes in seconds, large square holes in minutes.

With this new device in the shop I set about making a scale prototype- with full-size joints- to test if it's strong enough. A bed needs to disassemble and assemble relatively easily- it usually one of the largest pieces of furniture in the house and needs to be moved relatively often. This means that the joints can't be screwed or glued. However, they need to be strong enough to hold against, well.... repeated violent movement let's say.
The design I came up with involves a large mortise and tenon joint, held secure with a large dowel. Here is the first version in the prototype, where the peg is inserted vertically. Testing- by jumping on it mind you- proved that this was sturdy enough with these type of joints.

And in the actual frame, where the pin goes in horizontal- making for a much more structurally sound joint.


And here is the bed as it stands as of this morning. Finally looking like a bed- sort of. Finally looking like my drawings. On the home stretch? Maybe, but let's not get carried away.

Martin and Jake brought over the Mortising machine on Monday, and on Wednesday morning I was ready to give it a try. The first times through there was jagged edges and a bit of smoke, but it worked. Square holes in seconds, large square holes in minutes.

With this new device in the shop I set about making a scale prototype- with full-size joints- to test if it's strong enough. A bed needs to disassemble and assemble relatively easily- it usually one of the largest pieces of furniture in the house and needs to be moved relatively often. This means that the joints can't be screwed or glued. However, they need to be strong enough to hold against, well.... repeated violent movement let's say.
The design I came up with involves a large mortise and tenon joint, held secure with a large dowel. Here is the first version in the prototype, where the peg is inserted vertically. Testing- by jumping on it mind you- proved that this was sturdy enough with these type of joints.

And in the actual frame, where the pin goes in horizontal- making for a much more structurally sound joint.


And here is the bed as it stands as of this morning. Finally looking like a bed- sort of. Finally looking like my drawings. On the home stretch? Maybe, but let's not get carried away.

Friday, August 6, 2010
My First Chair - In Three Days
Dear Internet,
It's hard to believe that in all my years in ID that I've never built a chair. I've drawn tons of them, but never managed to fully realize one. The chair- the archetypal design object- somehow never made it into my to do list. Probably because I wasn't confident in my ability to make something that wouldn't fall over and injure my friends.
The project just came up as an ad hoc thing- we need a shop chair. I took a quick break from the bed project and decided to do something fun. The picture that came into my mind was a bent pipe structure with a wood seat- and then I set myself a challenge- design a chair built out of a single 10-foot length of electrical conduit. Cost: $1.80.
I did some sketching, but learned most of what I wanted from these prototypes, which were made from a single piece of wire, 10 inches long and some bass wood.

The difficulty I reached was that I needed a seat height of at least 24 inches, because while standard table height is 30", standard work counter height is 36" for easy access while standing. So the seat height for a chair for counters is 24" tall instead of the standard 16-18". With the minimum two legs for a chair this took nearly half of my entire 10-foot length, and not provide much structure. I settled on a design I liked, bought some conduit, and set to bending it.

Bending pipe is hard, and bending specific angles with a pipe bender is nigh impossible for a novice. Then, these bends become the weak points in the structure and collapse with maybe 20 pounds of force, not enough to hold even a small child. So, after ruining 20 feet of electrical conduit, I abandoned the challenge.
The next incarnation I would do with pipe fittings, where the joints are actually the strong points in an angle, and hope that would solve accuracy and structure problems. Home Despot doesn't sell steel pipe in any useful amount, so I visited an old friend, copper pipe. My altered ikea futon ran on copper pipe, and have always liked the way it looks with light wood. My design had to be altered because the store only has 90 and 45 degree pipe fittings. I put it together with some JB weld, and got this neat shape. Remind anyone of certain Reitveld chair?


This version was also to weak to hold me, and the joints twisted some in place. Back to the hardware store, for more pipe fittings and a special copper glue emblazoned with the warning SEVERE SKIN IRRITANT. That's how you know it's good. At Martin's advice I added two supports going from directly under the seat to the footrest, crossing the original supports. That did the trick, and also added to the aesthetic of the chair- it's now my favorite part.

I had a bunch of friends over for dinner and the chair was given a lot of attention and praise. The chair does feel like it's tilting you slightly forward if you put your feet on the floor, but if you're working at a counter, it's not at problem, even an advantage. But for sitting in the middle of a room with a plate in your lap trying to eat chicken wings, not so much.
The chair now resides in the shop and must endure the final test- the endurance one.

It's hard to believe that in all my years in ID that I've never built a chair. I've drawn tons of them, but never managed to fully realize one. The chair- the archetypal design object- somehow never made it into my to do list. Probably because I wasn't confident in my ability to make something that wouldn't fall over and injure my friends.
The project just came up as an ad hoc thing- we need a shop chair. I took a quick break from the bed project and decided to do something fun. The picture that came into my mind was a bent pipe structure with a wood seat- and then I set myself a challenge- design a chair built out of a single 10-foot length of electrical conduit. Cost: $1.80.
I did some sketching, but learned most of what I wanted from these prototypes, which were made from a single piece of wire, 10 inches long and some bass wood.

The difficulty I reached was that I needed a seat height of at least 24 inches, because while standard table height is 30", standard work counter height is 36" for easy access while standing. So the seat height for a chair for counters is 24" tall instead of the standard 16-18". With the minimum two legs for a chair this took nearly half of my entire 10-foot length, and not provide much structure. I settled on a design I liked, bought some conduit, and set to bending it.

Bending pipe is hard, and bending specific angles with a pipe bender is nigh impossible for a novice. Then, these bends become the weak points in the structure and collapse with maybe 20 pounds of force, not enough to hold even a small child. So, after ruining 20 feet of electrical conduit, I abandoned the challenge.
The next incarnation I would do with pipe fittings, where the joints are actually the strong points in an angle, and hope that would solve accuracy and structure problems. Home Despot doesn't sell steel pipe in any useful amount, so I visited an old friend, copper pipe. My altered ikea futon ran on copper pipe, and have always liked the way it looks with light wood. My design had to be altered because the store only has 90 and 45 degree pipe fittings. I put it together with some JB weld, and got this neat shape. Remind anyone of certain Reitveld chair?


This version was also to weak to hold me, and the joints twisted some in place. Back to the hardware store, for more pipe fittings and a special copper glue emblazoned with the warning SEVERE SKIN IRRITANT. That's how you know it's good. At Martin's advice I added two supports going from directly under the seat to the footrest, crossing the original supports. That did the trick, and also added to the aesthetic of the chair- it's now my favorite part.

I had a bunch of friends over for dinner and the chair was given a lot of attention and praise. The chair does feel like it's tilting you slightly forward if you put your feet on the floor, but if you're working at a counter, it's not at problem, even an advantage. But for sitting in the middle of a room with a plate in your lap trying to eat chicken wings, not so much.
The chair now resides in the shop and must endure the final test- the endurance one.

Tuesday, August 3, 2010
A Mortising Machine
Dear Internet,
I finally got back to building today, and seeing as how it's been a while, I decided to put in a full eight hours. The first step was straightening the frames I already had. Then, after routing out a channel in the upper sections, I inserted a panel of maple plywood, similarly to how I put in the side panels from the futon.

The next step was to start putting the frames together. The eight cross pieces are all identical, and 30 inches long. And all need tenons on both ends. Fortunately, we now have a router table and making 16 identical tenons is a breeze!

For every tenon there is a mortise, however, and the rest of the day was spent drilling holes, and making them square with chisels. After all, there's no such thing as a drill that cuts square holes, right?

Wrong.
Martin stops over again to check my work- and again say something that's hard to hear. He sees my work, and says, "I guess a mortising machine is pretty high on your list about now."
A Mortising Machine?!? Surely he's joking- but no, such a machine does exist- and it uses a chisel-cornered bit to punch square holes! There are plenty of YouTube videos showing how they work if you don't believe me. I always thought the square hole was just a carpentry joke- but there it was, my day's work done in a few minutes by a clever machine.
I now understand- on a much smaller scale- how those craftsman felt when their careful handiwork was replaced by clean, new machines, when our society turned away from custom made products and toward manufactured ones. Their steady hands and practice rendered obsolete, by something that would never need to learn or be paid. It's a sad story, but it's told over and over again with technology- it's the way of things.
So there we have my basic conflict- the purity of the craft versus the ease, speed, and accuracy of a new machine. I wish I could wrap up this post with a clever answer to this conundrum, but I can't. I'll probably just buy one, and never think about mortises again.

I finally got back to building today, and seeing as how it's been a while, I decided to put in a full eight hours. The first step was straightening the frames I already had. Then, after routing out a channel in the upper sections, I inserted a panel of maple plywood, similarly to how I put in the side panels from the futon.

The next step was to start putting the frames together. The eight cross pieces are all identical, and 30 inches long. And all need tenons on both ends. Fortunately, we now have a router table and making 16 identical tenons is a breeze!

For every tenon there is a mortise, however, and the rest of the day was spent drilling holes, and making them square with chisels. After all, there's no such thing as a drill that cuts square holes, right?

Wrong.
Martin stops over again to check my work- and again say something that's hard to hear. He sees my work, and says, "I guess a mortising machine is pretty high on your list about now."
A Mortising Machine?!? Surely he's joking- but no, such a machine does exist- and it uses a chisel-cornered bit to punch square holes! There are plenty of YouTube videos showing how they work if you don't believe me. I always thought the square hole was just a carpentry joke- but there it was, my day's work done in a few minutes by a clever machine.
I now understand- on a much smaller scale- how those craftsman felt when their careful handiwork was replaced by clean, new machines, when our society turned away from custom made products and toward manufactured ones. Their steady hands and practice rendered obsolete, by something that would never need to learn or be paid. It's a sad story, but it's told over and over again with technology- it's the way of things.
So there we have my basic conflict- the purity of the craft versus the ease, speed, and accuracy of a new machine. I wish I could wrap up this post with a clever answer to this conundrum, but I can't. I'll probably just buy one, and never think about mortises again.

Sunday, August 1, 2010
The Last Two Weeks
Dear Internet,
After some serious demand by some readers, I am finally getting back to you all. Seriously- with as many people who reminded me I haven't written a post in the last couple of weeks you'd think I get 100 hits a day! But it's true- I haven't spent the last fortnight playing with the new router table. So much more has been going on.
The bed has been progressing slowly. When I get a chance to work on it, it comes out well, as the router table makes tenons a breeze, but right now, all I have is the three frames for the back, and a bit of editing is needed there. I should get back to the whole thing tomorrow- and have no trouble finishing the back, aside from the cushions in the next week. Although, I may jump to it- the idea of upholstering something is making me giddy.

The first week was filled by a trip to Atlantic City- a good friend was turning 21 and I promised his sister to show him a great time. I think fruit-flavored cigars on the boardwalk at 2am will be a birthday memory worth keeping. Our second night there we celebrated my birthday with a night of great food and more gambling. I ended the trip making an extra $150, and blew it all at the Apple store, buying myself an iPad for my birthday. Review to come later.

Upon return, the focus of the shop work turned to a project Jake was working on, making a three-foot tall model of a house out of corrugated cardboard. The model was four inches thick on all sides- and required gluing over 120 layers of cardboard together and cutting it on the table saw. Afterward we covered the studio in cardboard fuzz and super77, and lost a folding table to an un-impenetrable layer of glue and WD40. Much to our dismay, we did not see it put on Good Morning America like we had hoped.

After relaxing for a couple days, attention turned to shelving. Our shop needed more room for project work and more room for materials and the only way to go was up. We got a hint on a place that was getting rid of a whole mess of shelves- you'll remember them from the liquidation liquidation from months ago.

One long morning to take them apart and move them, another whole day to reassemble them in our place, put our work on them and move the curtains, and finally the shop is as much done as it can be. No more work delays to do some shop-related thing. And even better- no more spending money!
The last couple days Jake got into stop-motion animation and made this opening logo for our website (www.erg0.com) which is sure to be fleshed out in the coming months. I did come CAD work on our coatrack project we're doing for Chris (another blog post coming on that as well) and that gets you up to yesterday.
Now you all can stop bothering... Just kidding- it's great having people who care enough about what's happening in your life to push you to let on more about it! Thanks for reading, and stop by for a post tomorrow- I promise.
After some serious demand by some readers, I am finally getting back to you all. Seriously- with as many people who reminded me I haven't written a post in the last couple of weeks you'd think I get 100 hits a day! But it's true- I haven't spent the last fortnight playing with the new router table. So much more has been going on.
The bed has been progressing slowly. When I get a chance to work on it, it comes out well, as the router table makes tenons a breeze, but right now, all I have is the three frames for the back, and a bit of editing is needed there. I should get back to the whole thing tomorrow- and have no trouble finishing the back, aside from the cushions in the next week. Although, I may jump to it- the idea of upholstering something is making me giddy.

The first week was filled by a trip to Atlantic City- a good friend was turning 21 and I promised his sister to show him a great time. I think fruit-flavored cigars on the boardwalk at 2am will be a birthday memory worth keeping. Our second night there we celebrated my birthday with a night of great food and more gambling. I ended the trip making an extra $150, and blew it all at the Apple store, buying myself an iPad for my birthday. Review to come later.

Upon return, the focus of the shop work turned to a project Jake was working on, making a three-foot tall model of a house out of corrugated cardboard. The model was four inches thick on all sides- and required gluing over 120 layers of cardboard together and cutting it on the table saw. Afterward we covered the studio in cardboard fuzz and super77, and lost a folding table to an un-impenetrable layer of glue and WD40. Much to our dismay, we did not see it put on Good Morning America like we had hoped.

After relaxing for a couple days, attention turned to shelving. Our shop needed more room for project work and more room for materials and the only way to go was up. We got a hint on a place that was getting rid of a whole mess of shelves- you'll remember them from the liquidation liquidation from months ago.

One long morning to take them apart and move them, another whole day to reassemble them in our place, put our work on them and move the curtains, and finally the shop is as much done as it can be. No more work delays to do some shop-related thing. And even better- no more spending money!
The last couple days Jake got into stop-motion animation and made this opening logo for our website (www.erg0.com) which is sure to be fleshed out in the coming months. I did come CAD work on our coatrack project we're doing for Chris (another blog post coming on that as well) and that gets you up to yesterday.
Now you all can stop bothering... Just kidding- it's great having people who care enough about what's happening in your life to push you to let on more about it! Thanks for reading, and stop by for a post tomorrow- I promise.
Thursday, July 15, 2010
How to Turn a Regular Table into a Router Table in 7 Easy Steps
Yesterday, in need of a router table and possessing a router, with some help from instruction by Martin we took the table in our workshop, and turned it into a router table- a great tool for making details on wood- and is way more stable and exact than a normal router would be. Here's how you can make one yourself!

1. Acquire a router.
Unless you're an expert machinist you have to start with a working router. Seek one out with a detachable base if possible.
2. Acquire a table.
Ok, easy so far right? Ideally your table should be standing height (36") and the kind you don't mind putting holes in. "Look grandma, I gave your dining table more HORSEPOWER!" is not always a phrase that goes over well.
3. Drill three holes.
Figure out where the holes will need to be by removing the base, taking the face plate off the base, and marking through the screw holes onto the table. A good spot is about six inches to a foot from a corner. Drill up from the bottom, and then countersink the tops deep enough so that the mounting screws catch the threads.
.jpg)
4. Screw the router base to the table.
Um. Yeah. Do that.
5. Drill the center hole.
Mount a medium size straight bit into the router, slide the router into its base and turn it on. SLOWLY raise the router through the table. Repeat this with wider and wider bits until your largest bit fits through.

6. Add a fence.
A fence can have a single pivot point , and still work. Because a router has a rotary bit, there is not such thing as cutting an angle. We made ours by drilling a hole on the close side of the table, putting a dowel through a piece of wood, and setting it in place, holding the distance with a clamp. This setup is great, because its entirely removable. Swing your fence SLOWLY through a running router bit- it will cut an arc into it. This will allow you to do partial cuts by placing the fence over half of the bit.

7. Sand the tabletop.
Sand it all as close to flush as possible, and always remove any lumps or glue globs or whatever before you use it.
Great! Now you have an awesome router table for no more than the cost of a router and a table!

1. Acquire a router.
Unless you're an expert machinist you have to start with a working router. Seek one out with a detachable base if possible.
2. Acquire a table.
Ok, easy so far right? Ideally your table should be standing height (36") and the kind you don't mind putting holes in. "Look grandma, I gave your dining table more HORSEPOWER!" is not always a phrase that goes over well.
3. Drill three holes.
Figure out where the holes will need to be by removing the base, taking the face plate off the base, and marking through the screw holes onto the table. A good spot is about six inches to a foot from a corner. Drill up from the bottom, and then countersink the tops deep enough so that the mounting screws catch the threads.
.jpg)
4. Screw the router base to the table.
Um. Yeah. Do that.
5. Drill the center hole.
Mount a medium size straight bit into the router, slide the router into its base and turn it on. SLOWLY raise the router through the table. Repeat this with wider and wider bits until your largest bit fits through.

6. Add a fence.
A fence can have a single pivot point , and still work. Because a router has a rotary bit, there is not such thing as cutting an angle. We made ours by drilling a hole on the close side of the table, putting a dowel through a piece of wood, and setting it in place, holding the distance with a clamp. This setup is great, because its entirely removable. Swing your fence SLOWLY through a running router bit- it will cut an arc into it. This will allow you to do partial cuts by placing the fence over half of the bit.

7. Sand the tabletop.
Sand it all as close to flush as possible, and always remove any lumps or glue globs or whatever before you use it.
Great! Now you have an awesome router table for no more than the cost of a router and a table!
A Design for a Bed!
Here's what we're going for:
The back is reclined about 25 degrees for sitting and reading in bed. The large panels will be cushioned and upholstered. In what color you ask? Orange of course!

The nightstand will slide out of the side. The design could facilitate two of these, but my room can only fit one, so my version will only have one.

The foot is minimalist and of simple construction.

The full bed design.

The back is reclined about 25 degrees for sitting and reading in bed. The large panels will be cushioned and upholstered. In what color you ask? Orange of course!

The nightstand will slide out of the side. The design could facilitate two of these, but my room can only fit one, so my version will only have one.

The foot is minimalist and of simple construction.

The full bed design.

Monday, July 12, 2010
Zig Zag
Here in our studio, activity is getting to an all-time high. We've got several projects going right now, which I'll talk about over the next couple of days.
The first is the Zig Zag Chair replica. Jake and I learned about this chair in our history of design class. Its designed by Rietveld, and, as you can see it is a relatively simple form. So simple, in fact, that the first response when we saw it was- "Hey, we could make that. Easy."

The chair runs for as much as $600, which seems astronomical.
Plans are available online for the chair, and when you see how its built, you realize how foolish you were.
Skip the next paragraph if you just want to take my word for it.
The joints at the seat and at the rear of the foot are 45 degree angles along a long edge, meaning you need to cut a 67.5 degree angle out of a long edge on each piece. Table saws typically only have an angle tilt of 45 degrees so you need to make a jig. Then Each joint is secured with drilling and filled with dowels. Drilled at a 22.5 degree angle, straight and regularly spaced. Oh and did I mention that there's a slight flare at the knees making the seat not square! Or that the joint between the seat and the back is a 98 DEGREE BOX JOINT! (Trust me, difficult.)
Look at it again. Minimalist? Yes. Simple? Not even close. The essence of modernism.
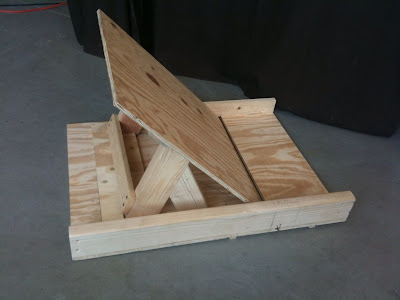
That being said, we're going to try to make them. Four of them. We've made a jig for the table saw.
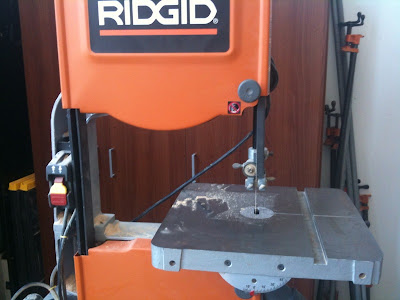
We have a better band saw which we can use on the complicated box joint.
We still need to figure out how to do the drilling. But in the meantime, I made this:
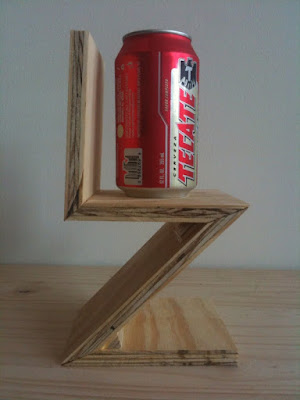.jpg)
More projects, including a completed bed design to come!
The first is the Zig Zag Chair replica. Jake and I learned about this chair in our history of design class. Its designed by Rietveld, and, as you can see it is a relatively simple form. So simple, in fact, that the first response when we saw it was- "Hey, we could make that. Easy."

The chair runs for as much as $600, which seems astronomical.
Plans are available online for the chair, and when you see how its built, you realize how foolish you were.
Skip the next paragraph if you just want to take my word for it.
The joints at the seat and at the rear of the foot are 45 degree angles along a long edge, meaning you need to cut a 67.5 degree angle out of a long edge on each piece. Table saws typically only have an angle tilt of 45 degrees so you need to make a jig. Then Each joint is secured with drilling and filled with dowels. Drilled at a 22.5 degree angle, straight and regularly spaced. Oh and did I mention that there's a slight flare at the knees making the seat not square! Or that the joint between the seat and the back is a 98 DEGREE BOX JOINT! (Trust me, difficult.)
Look at it again. Minimalist? Yes. Simple? Not even close. The essence of modernism.
That being said, we're going to try to make them. Four of them. We've made a jig for the table saw.

We have a better band saw which we can use on the complicated box joint.

We still need to figure out how to do the drilling. But in the meantime, I made this:
.jpg)
More projects, including a completed bed design to come!
Subscribe to:
Posts (Atom)


